Pages

Thursday, February 16, 2012

Bleached T-Shirts

So I have gotten excited about some bleached T-Shirts that I found on www.pinterest.com.  There are many ideas on the website and I have tried a few different methods.  The nice thing is each time I make a shirt I get a little better at it. 

Be My Valentine
From the Heart

This Valentines I decided to make one for my daughter and one for her teacher.  They were a lot of fun to make and turned out very nice. 


Making these shirts is fairly inexpensive and a lot of fun.  This could be a quick easy project for your children to do or a way to make a fun, personalized gift.

The items you will need are:

1 Tee Shirt (something with a 50/50 blend works best)
1 spray bottle
water
bleach
stencil
plastic bag
cardboard box
washing machine
paper towels

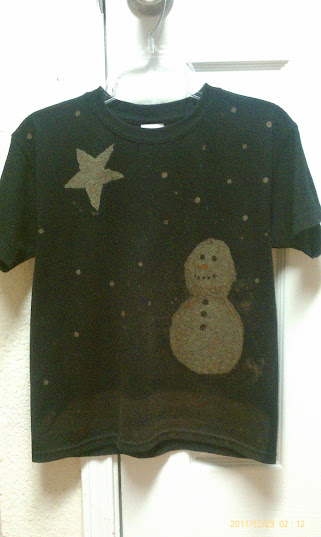
First you will need to protect the surface area you intend to work on.  To do these I used the middle of my kitchen floor.  I placed a flattened card board box on the floor and laid my T-shirt across the box.  I took a plastic trash bag and flattened it out and put it inside the T-shirt to keep the bleach from soaking through to the other side.


 I then took my stencil and placed it on my T-shirt.  This stencil is not what I would recommend for you to use on a regular basis but it was so cute I could not resist.  I picked it up at Michael's and it is made out of balsa wood.  It is a bit fragile and will not hold up to repeatedly bleaching very many times.


Next, I filled my spray bottle with 50% water and 50% bleach and tested the spray to insure that it was set for a fine spray mist.  You can get several different looks on your T-shirt by incorporating different methods but I like graduating from a dark T-shirt at the bottom to a lighter bleached look at the top.  Once I have the desired amount of bleach on my shirt I take a paper towel and remove the bleach on top of the stencil being careful not to blot the rest of the T-shirt.  I then remove the stencil from the shirt so that I can watch the bleaching until it gets to the color I am happy with.


Once I am happy with the result I see, I carefully remove the plastic bag or the cardboard I have placed inside the shirt.  I then take my shirt to the washing machine that I prefilled with laundry soap and hot water and dunk the shirt in a few times and then wash the shirt. I dry the shirt in the dryer as soon as it is through washing.  The following times I wash the shirt I tend to let them line dry as to not weaken the material too much.


This is how the shirts looked after they had been run through the dryer. 


Here are some other shirts I have done in the past.

Christmas Tree
Reindeer on a Snowy Night
Snow Man on a Snowy Night


Too Much Hot Chocolate


I will be adding some tips and tricks I have learned over the past week from a new Face Book friend named T.J. to make the process more efficient.  This is T.J.'s Facebook page and he is actually selling the Tee's he makes. 

As always feel free to post any questions or comments; I am always happy to share my ideas and how to do's.

Happy Crafting!

Wednesday, February 15, 2012

Valentine Cake Pop's, Oh My!

I received a wonderful cake pop pan for Christmas this past year and decided Valentines would be the perfect chance to try it out.  I am so glad I did.  (Once again, thank you Aunt Jo Ann, what a wonderful and creative gift.) 

Cake Pop Pan

This pan is unique because it consists of two parts, a bottom half that you fill with the cake batter and a top half that you secure with the silicone clips that are provided by the pan. It also comes with plastic sticks but I chose to use cake pop sticks I bought at Michael's so that I did not have to worry about getting my plastic one back.  As the cake bakes it will rise and fill the top half of the pan to form a ball.  The holes on top provide an escape for any extra batter that is unneeded.  This batter may cook and form a hard top crust. Just allow the cake to cool for about ten minutes after pulling them out of the oven this flick the top crust of the pan before opening the top.  Make sure to use ovenmits while opening the pan so you are not burned by escaping steam. 

I made these yummy cake pops for my daughters' class Valentine’s Day party.  They turned out so good and stirred up a lot of questions from the other mom's about how I made them, how long did it take, what method did I use and if I were willing to sell them.  Of course I am more than willing to share my secrets on how these delicious cake pops are made and I am always willing to sell my homemade items to my friends. So I decided that putting the directions into my blog would be a wonderful idea. 

Ok, let's begin...

It is very important to make sure your pans are clean and COMPLETELY dry before you start to cook with them.  Next, coat the inside of both pans with cooking spray that include flour.  There are several on the market.  I have one from Pam and one from Baker's Joy in my pantry and they both work very well.  Do Not use canola or vegetable oil on the pans as it will result in unevenly cooked Bake Pops. 

Preheat your oven to 350 degrees, never exceed 375 degrees or might damage your pans.

Time to make your batter.  I followed the directions inside the small pamphlet that came with my pans.  Use one standard box of cake mix according to directions.  For best results: use an extra egg, substitute milk for water and use half as much as the recipe calls for and add a package of dry pudding mix that matches your cake choice (ex. chocolate cake with chocolate pudding)  This will create a denser cake. 

Pour batter into bottom of Pan until all cavities are filled (start filling in the center of pan and work your way out to the sides)  I use a large Zip Lock Freezer bag and snip the end off to fill the cups.  The pan will make 18 cake pops but the batter will make 36.  Be sure to lay your bag so that the extra batter does not escape while you are waiting for you first set of cake pops to cook.  Next cover the bottom pan with the top Pan make sure that the holes are on top and then secure the two pans together with the clips.  (see the photo above)

Bake at 350 Degrees for 25 to 30 minutes

Let the pans cool before removing the top pan.  If any cake has baked through the holes, after the pans have cooled at least ten minutes simply scrap the batter off the top with anon-metal spatula so not to damage the pan)  using dry ovenmits remove the clips and carefully take the top pan off the bottom.  Be careful not to get burned by the steam.  After the cakes have completely cooled you may need scrape off a ring of crust that has formed around the balls, it should be easy to remove with your fingers.  You may find that your cake seems to have a hard crust on the bottom.  If this is the case, after you are sure they are completely cooled, simply place all the balls in a Ziploc bag over night.  They will be nice and soft and easy to use the next day.

Now for the fun part, Decorating!

Melt a small amount of candy coating in a microwaveable bowl following the instructions on the candy melts.  1 min. on half power and stir, then 30 sec. at half power until it reaches the desired consistency being sure to stir between heating. 

Take a cake pop stick and pierce a hole into the bottom of each of the cake balls being careful not to pierce all the way through.  Next dip the end of the stick into the melted candy and then place the end into the cake ball.  Repeat until all the cake balls have a stick in them and allow to cool and set.  You may place the cakes into the freezer for a brief amount of time, about 15 minutes or so which will allow the candy to harden and the cake balls to become cool.  This will be helpful later when we coat the cake balls. 

Next, hopefully you paid attention to the Tips and Tricks section in the pamphlet and purchased a large foam block (like a floral block)  It will allow the Cake Pop's to cool upright which helps in preparation and while you are decorating.  I would also like to suggest that laying a piece of wax paper of the block will be helpful to keep the foam block clean during the final part of decorating.  (As you will see I did not read my Tips and Tricks until later so I had to improvise this part. I used my cooling racks and the top part of my cake pan and carefully place the stick through the hole which allowed the pop to cool without being touched.  Not perfect but it worked.

Melt a larger batch of candy melts in the microwave using the same directions above.  Once fully melted take a cake pop and begin spinning the cake in the candy coating until fully coated.  It took me a while but I found that the best way to completely coat the pop was a spinning wrist movement that flung the candy off the cake.  I would then occasionally bring the cake back upright until and if I noticed large drips forming I would then again give it another spin.  It took about 1 to 2 minutes for each cake pop with this method to get it to a point I could place it upright without having a lot of candy coming down the stick.  You can place the cake pops in the fridge to help them to harden quicker.  Once dry they will turn opaque.

There are many ways to add a little pizazz to your pops I choose two different colored candy melts.  I melted another color of candy melts in the microwave (red) and dipped a spoon in and then just dripped the red melted candy over the top of the cake pops.  Again, the foam block and wax paper would have been helpful here and made for easier clean up.  But they turned out really cute anyway.  (If you use this method, for cleanup place pan on a cookie sheet in a warm oven until the candy on the pan becomes soft and then take a paper towel and wipe it off.  Do not use something abrasive on the pan or you will ruin your pan.)

Here is another option for drying your pops,  I wish I had thought of this myself but I found this idea on www.pinterest.com.


To add other decorations you can take a wet pop before the candy dries and dip it into colored sugar, jimmies, and nuts or even after you have added a second color sprinkle with colored sugar.  The possibilities are endless. 

Last but not least, the final touch.  Michael's and other stores like Michael's sell Cake Pop bags.  The bags are the perfect size to put in one cake pop and wrap in the provided twisty tie.  They should have whatever theme you like. Such as these Valentine ones seen on this page here.


Well, that is it.  Easy Peasy and so much fun.  The cake pops turned out really good and moist and just the perfect bite, not too much not too little. Just right.

Well as always, if you have any questions or need clarification on something let me know.  Feel free to make comments or ask questions.  I always appreciate feedback and always happy to lend a hand.

Have a wonderful day and Happy Baking!

Sweet Heart Strawberry Cupcakes

 Happy Valentine's Day!

This year Valentine's Day was a complete success; I got to share this special day with friends and family and learn a few new techniques to improve my baking.  I had the pleasure of coming up with this cupcake for my daughters Valentines Class Party.  I had so much fun, so let me share how I made these. 

Sweet Heart Strawberry Cup Cake
Let me introduce you to my new Sweet Heart Strawberry Cupcake.  This little guy is a soft, sweet, moist cupcake filled with bites of strawberry goodness.  I am even willing to say it is the best cupcake I have ever made.  I am sure you are wondering what makes this cupcake so different from any other cupcake.  The secret ingredient is buttermilk.   Yes, I said buttermilk.  I found a wonderful recipe in a book called "Hello, Cupcake!" written by Karen Tack & Alan Richardson.                                                                         .
I am including it here.

Perfect Cake-Mix Cupcakes

1 box (18.25 ounces) cake mix (French vanilla, devil's food or yellow) (I used vanilla)
1 Cup buttermilk (in place of the water called for on the box)
Vegetable oil (the amount on the box)
4 large eggs (in place of the number called for on the box)

Mix all the ingredients in a mixer.

Preheat oven to 350 degrees, bake for 15 to 20 minutes, remove to a cooling rack and cool completely before icing them.  Makes 24 cup cakes.

My icing is a typical Wilton Buttercream icing. (With a twist)

Strawberry Buttercream Icing

1/2 cup solid vegetable shortening
1/2 cup butter or margarine
1 teaspoon Clear Vanilla Extract
2 teaspoons Imitation Strawberry extract (I really like the flavor of Watkins)
2 drops of red food coloring
4 Cups sifted confectioners' sugar (approx. 1 lb.)
2 Tablespoons milk

Make sure the shortening and butter are softened, place in mixer and beat until smooth.  If there are still lumps let the mix sit for about five minutes and beat again. Add one cup at a time of the sifted confectioners' sugar as follows mixing in between each, add vanilla after the first cup of sugar has been added, Mix, add second cup of sugar and then two teaspoons of strawberry extract, Mix, add third cup of sugar and then a Tablespoon of milk, Mix, add fourth cup of sugar and another Tablespoon of milk, Mix.  Lastly add two drops of red food coloring. (if this does not give you your desired color you can add more)

Hint:  Do your best to not over beat the icing, doing so whips too much air into the icing and it will not pipe out smoothly.


I used a 12" disposable piping bag and a Wilton #21 decorating tip.  If you do not have piping bag you can always us a large plastic storage bag, freezer bags work best because they are denser.


Lastly as soon as I piped the icing on the cake I rolled the edges onto a dish of Wilton Red Sugar Sprinkles and then topped immediately with these sweet Heart Shaped Sugar Sprinkles.  (You do not want to wait until you have all the cupcakes iced to put the toppings on.  The icing will begin to set and the toppings will not adhere as well.  I suggest not piping more than two before you add the toppings.)


So I mentioned in my previous post how much I was intrigued by the multicolored cupcakes I found on www.pinterest.com .  So I had to give it a shot. 

Using the batter from the recipe above I took about half the batter put it into a large freezer Ziploc bag, snipped off one of the corners and piped it into the cup cake cups. I piped the batter around the cup staying close to the edges as much as possible.  I then put what was left of the batter in the bag back into the mixer and added a couple drops of red food coloring.  I got another bag and filled it with the batter and filling in the area that was left and mostly in the center I piped my second color.  i took the batter that was left and put it back in the mixer and added a couple more drops of food coloring to get a darker shade of pink.  I then put into another Ziploc bag, snipped the end off and put the tip on the bottom of the cup in the center and gave it a good squeeze while pulling up.  As you can see there are three distinct colors of batter than you can see in the above picture.  I then placed them into the oven to bake.

However....


Inside of Cup Cake
This is my end result.  Not too bad for a first attempt, but I know I can do better.  There are two things I notice here right off.  I have holes in the middle of my cake and I can only see two true colors.  I think my first two shades were too close to the same color and that is why I cannot see three colors.  To get rid of the air pockets inside the cake it is important and I forgot to do this but to slightly drop the pan a few times on the counter to raise the air that is caught in the cake.  You must do this carefully but it will keep the inside of the cakes from drying out from the trapped air that is caught in there and it makes for a nicer dense moist cake.


Here is my final result.

Final Result
What do you think?

I am completely in love with these sweet wonderful bites of yummy goodness!  I will be using this cup cake recipe again and again because the cakes come out light and not heavy.  They are PERFECT! 

I would love to hear any comments you have about the cupcakes especially if you were lucky enough to get to try the ones I made or if you try the recipe yourself.  All feedback is good feedback because it will help me to become a better writer and a better baker.  Any and all questions are welcome as well.

Happy Baking!

Sunday, February 12, 2012

Valentine Jitters Be Gone!

Valentines is a holiday I don't usually love thinking about.  I know many people who spend weeks planning the perfect night, making reservations, finding the perfect outfit, and shopping for the perfect gift. I am not that kind of person.  I prefer a quiet night at home cooking my family’s favorite dishes and making a special dessert. 

I often find myself at a loss as to what to do for Valentines.  I don't think it is because I don't have a romantic bone in my body; I think it is because I find it overwhelming with so many different possibilities.  I am very lucky that I don't have that problem this year.

There have been many new kitchen gadgets to hit the market the past year or two and I am fortunate enough to have received many of them as gifts this past Christmas.

So, when one of the room mother's for my daughter's class asked me to bake cupcakes for the class Valentine party, I thought "Ya, I can do that".

Remember when I said I find Valentines overwhelming?  Well I have a problem with wanting to try it all and this year I can.  I received a book about cupcakes and neat ways to decorate them along with a really cool cup cake pan from my sister-in-law for Christmas. (Thank you Ms. Courtney, I am sure they will come in handy.)  If that was not perfect enough I was also given cake ball pans from my husband’s aunt. (Thank you Aunt Jo Ann.)  And, my mother gave me a mini cupcake machine (Thanks Mom!); and my daughter also received a spritz cookie machine from her cousins. (Thank you Zach and Lizzy!)

I have spent days trying to figure exactly what I wanted to do.  I first looked through my new Cup Cake book; Hello, Cupcake by Karen Tack & Alan Richardson.  I found an ingenious method for filling cup cake pans.  Why I never thought of this I have no idea, but you take a gallon size freezer bag and fill it with the batter.  Remove as much air as you can, zip it closed.  Snip the corner off, lower the bag corner into the cupcake pan and squeeze just the right amount into the pan.  Lift, and move to the next spot.  You will end up with a no mess cupcake pan that was quickly filled.  Amazing right?

So next I check one of my favorite websites, www.pinterest.com.  (What?  You don't know about Pinterest?  Check them out and if you want a quick invite drop me a line and I will send you one as quick as I can.)  I have been pinning all things Valentines for a month and I knew I could find good ideas there for how to decorate my cupcakes and what flavor to make them. 

And, I was right.  I am totally intrigued by these multi-colored cupcakes I found on www.pinterest.com.  Yes, that means more work for me but that also means I get to learn how to do something new.  I also learned that using a similar technique for filling the cupcake pan, I can fill several bags with different colored batter and squirt them into the cupcake cups and hopefully come out with some cool looking cup cakes.  I think the kids will love them; it will be a neat surprise and give them something to be curious about.  I am planning on blogging about this experience in more detail, so check back soon to see how it turns out. 


So cake pops are all the rage where I live.  I can't go anywhere without seeing them now.  I see them in bakeries, Starbucks and even on the flower delivery sites.  They are cute perfect size bits of YUM!  I have the pans and I have the sticks to put them on to make them more like suckers but it has been bugging me that I don't know how to ice these guys.  I have been thinking about it for days.  Finally today I sat down and looked at some other sites and discovered they use candy melts.  Well duh!  Makes totally sense!  I can hardly wait.  These are going in the kid’s gift bags and are going to be so much fun!

So, along with the cake pops I have this new neat machine I am just dying to try.  It makes mini-cupcakes!  But the neat thing is I can put them on a stick like the cake pops.  My plan is to give them to my daughter's teacher as a gift.


Then lastly, in my sleep last night I decided we needed to christen that Spritz Cookie Machine my daughter was given and bake cookies to place on top of the cupcakes for the kids.

So,  no pressure right.  All this in two days.  Can I do it?  You bet!

I still have no idea what my plans are here at home for Valentines, but I know the school party is going to be awesome!

Maybe I will decide to make reservations and take the family out for a nice meal.  We shall see.

Saturday, February 11, 2012

Anyone Can Cook

I know that there are a lot of people out there that believe that they cannot cook and are incapable of learning.  It is important to understand that even the finest of cooks had to begin somewhere; that they were not born with the knowledge of flavors, textures and what to do with them.  Somewhere along the way, someone introduced them to the concept of cooking.  They became passionate about food and enjoy being creative in the kitchen.

I don't remember the very first thing I ever cooked; but it seems I have been in the kitchen my whole life.  I can remember at a very early age learning to clean fresh shrimp and clean frog legs.  I could not have been more than age 5.  Oh don't worry.  I am not going to suggest you go catch a frog and cook it.  I too prefer a big plate of pasta to frog legs. My point is, there are many possible things out there to cook; you just need to decide what you want to try and jump in with both feet.

Some dishes you will attempt to cook will be perfection and some will be a disaster.  It happens to the best of us and it is important to remember everyone has off days. Don't get frustrated and give up; you can learn as much from a meal that is a flop as you can from food cooked to perfection. 

"So where do I start?" You might ask.  Think of something you would like to try and cook, ask your mom for a recipe.  She will love that you thought to consult her even if you decide not to use her suggestions it will make her feel good.  Look online, yes there are thousands of websites dedicated to providing you with recipes.  I would like to inject a warning here.  Just because it is online and on a recipe website does not necessarily mean in is a good recipe.  So if you try something and it does not turn out the way you expected.  Don't give up.  It could be the recipe was bad to begin with.  I suggest you look at several recipes, compare them and then choose one that is similar to others.  You might even read the comments about the recipe and see what others have to say about it. 

If you need help or have questions there are even websites that you can post questions and get very quick responses from helpful cooks.  You can always post here on my blog or I have listed some of my favorite Facebook pages over on the left hand side of my blog site where you can find answers within minutes.

So why did I title this post "Anyone Can Cook"?  I honestly believe if your stomach is telling you it is time to eat and you have the desire to feed it, you can just as easily go in the kitchen and fix yourself a quick meal as you can go out and spend three times as much at a restaurant.  You just have to make the choice to do so.

I will begin listing recipes with pictures and step by step instructions so you can always look on my page to see if there is something there you want to make.  I keep my meals typically simple and they usually take less than 30 minutes to make. Feel free to try anything I post and let me know how you liked my recipe good or bad.  Feedback is always useful when you are trying to become a better cook.

Try to remember even the best Chefs in the world at one point in time did not know how to cook and if they can do it, why not us?

"Happy Cooking"!